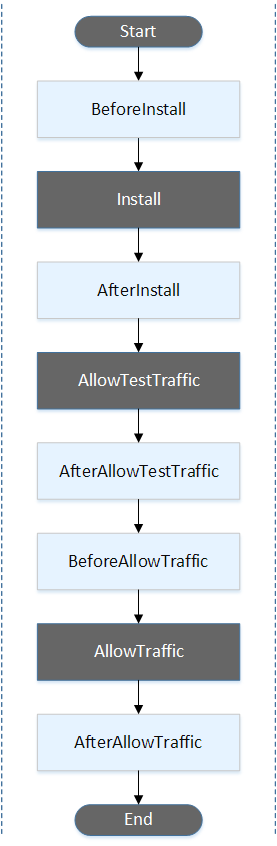
AWS ECS(관리형 컨테이너)나 CodeDeploy에는 위와 같은 LifeCycle이 있어, 해당 단계에 hook을 걸 수 있다.
hook이란?
배포 Life Cycle의 특정한 부분에 개입할 수 있게 해준다.
version: 0.0
os: linux
files:
  - source: /index.html
    destination: /var/www/html
hooks:
  BeforeInstall:
    - location: scripts/install_dependencies.sh
      timeout: 300
      runas: root
  AfterInstall:
    - location: scripts/change_permissions.sh
      timeout: 300
      runas: root
  ApplicationStart:
    - location: scripts/start_server.sh
    - location: scripts/create_test_db.sh
      timeout: 300
      runas: root
  ApplicationStop:
    - location: scripts/stop_server.sh
      timeout: 300
      runas: root
CodeDeploy에서는 위와 같은 형태로 각 LifeCycle마다 어떤 스크립트를 실행할 건지, timeout은 얼마나 줄 지 지정할 수 있다.
Kubernetes(AWS EKS)에서는 어떤 LifeCycle 단위로 hook을 걸 수 있나 찾아보니, 먼저
1. Container hook
PostStart와 PreStop 이 있다.
https://kubernetes.io/docs/concepts/containers/container-lifecycle-hooks/

PostStart
- 컨테이너가 생성된 직후에 실행되나 컨테이너 entrypoint(command)에 앞서서 실행된다는 보장은 없다.
- 해당 컨테이너를 포함하고 있는 파드의 컨텍스트와 동기적으로 동작하며, 컨테이너 entrypoint 와는 비동기적으로 동작한다.
PreStop
- 컨테이너가 종료되기 직전에 호출된다.
사용 방법
apiVersion: v1
kind: Pod
metadata:
  name: lifecycle-demo
spec:
  containers:
  - name: lifecycle-demo-container
    image: nginx
    lifecycle:
      postStart:
        exec:
          command: ["/bin/sh", "-c", "echo Hello from the postStart handler > /usr/share/message"]
      preStop:
        exec:
          command: ["/bin/sh","-c","nginx -s quit; while killall -0 nginx; do sleep 1; done"]
spec.containers.lifecycle 하위에 위와 같이 작성한다.
"/bin/sh" 명령어로 command를 실행하면, pod 내의 컨테이너에서 sh 로 다음 명령어를 실행하게 한다.
예제는 Pod 리소스인데, Daemonset 리소스에도 사용할 수 있었다.
2. Helm Chart Hooks
https://helm.sh/docs/topics/charts_hooks/
| 값 | 설명 |
| pre-install | 템플릿이 렌더된 이후에 hook을 실행합니다. 쿠버네티스의 리소스가 시작되기 이전에 작동합니다. |
| post-install | 쿠버네티스의 모든 리소스가 실행된 이후에 hook을 실행합니다. |
| pre-delete | 쿠버네티스에서 어떤 리소스가 삭제되기 이전에 삭제 요청을 처리합니다. |
| post-delete | 모든 리소스가 삭제된 이후에 삭제 요청을 처리합니다. |
| pre-upgrade | 템플렛이 렌더된 이후에 업그레이드 요청을 실행합니다. 쿠버네티스의 리소스가 업데이트되기 이전에 작동합니다. |
| post-upgrade | 모든 리소스가 업그레이드된 이후에 업그레이드 요청을 실행합니다. |
| pre-rollback | 템플릿이 렌더된 이후에 롤백 요청을 실행합니다. 쿠버네티스의 리소스가 롤백되기 이전에 작동합니다. |
| post-rollback | 모든 리소스가 수정된 이후에 롤백 요청을 실행합니다. |
| test | 헬름의 test subcommand가 야기될 때 hook을 실행합니다. |
apiVersion: apps/v1
kind: DaemonSet
metadata:
  name: fluent-bit
  namespace: test
  labels:
    version: v1
    app: fluent-bit
  annotations:
    "helm.sh/hook": post-install
와 같이 annotations에 helm.sh/hook으로 단계를 명시한 후,
helm create folder

folder/
├── charts
├── Chart.yaml
├── templates
└── values.yaml
helm을 적용할 폴더를 만들고, templates 안에 Kubernetes 리소스를 넣어 준다.
helm lint folder
helm install helm-hooks folder
위 명령어를 차례대로 적용하면 파드가 배포된다.
Configmap에 스크립트 파일을 넣고, 파드 배포 시 해당 스크립트 실행하기
apiVersion: v1
kind: ConfigMap
metadata:
  name: config
data:
  hello.sh: |
    #!/bin/sh
    echo hello world! >> ./test.log
Configmap 하위에
hello.sh 스크립트를 넣어준다.
apiVersion: apps/v1
kind: DaemonSet
metadata:
  name: fluentd-elasticsearch
  namespace: kube-system
spec:
  selector:
  template:
    spec:
      containers:
      - name: test
        image: testtest
        command: ["/bin/bash", "-c", "/test/etc/hello.sh"]
        volumeMounts:
        - name: config
          mountPath: /test/etc/
      volumes:
      - name:config
        configMap:
          name: config
          defaultMode: 0777
1) 먼저 volumeMounts로 configMap 파일의 파일들을 /test/etc 하위에 저장한다.
2) 그럼 생성되는 파드 컨테이너의 /test/etc 하위에는 hello.sh 가 있다.
3) 파드 컨테이너가 생성된 후 /test/etc/hello.sh를 실행한다.
4) kubectl exect podname -n namespace -- cat ./test.log 를 해보면 hello world! 가 찍힌다.
'인프라,데이터 > Docker, Kubernetes' 카테고리의 다른 글
| K6로 부하테스트 하기(도커, 쿠버네티스 환경) (0) | 2023.03.19 |
|---|---|
| Mac ssh to docker-desktop node (1) | 2022.05.16 |
| Failed to create bus connection: No such file or directory 오류 해결 (1) | 2022.05.04 |
| Kubernetes 특정 경로로 로그 파일 수집하기(nginx access 로그 만들기) (1) | 2022.01.11 |
| Kubernetes에서 Logstash(sqs output)를 사용해 elasticsearch, kibana로 로그 확인 (0) | 2021.12.28 |

